If you work as a freelancer, then you need to know how to write an invoice. After all, you want to get paid, don’t you?
Doing the job should be the easy part – running your business is the real challenge. When I first started as a freelancer, I had no idea how to write an invoice, what to include, or when to send it. I was afraid of overstepping boundaries with customers, and mortified of starting a legal fiasco from a poorly written invoice.

Email and Text Templates to Ask for Missing Payments
DownloadThat’s why I’ve created this template and shared a few tips for writing an invoice as a freelancer. I’ll walk you through how to use it and when to send these documents to your customers.
Freelancer Invoice Template
If you don’t have access to invoice software, let’s start by copying this template. Save it in a place where you can quickly make duplicates of it – like Excel, Google Docs, Word, etc.
Invoice Template for Freelancer Work:
| {Your Name/Company Name or Logo}
{Address} {Phone Number} |
Invoice: #
Due By: x/x/xxx |
||
| Date: | |||
| Bill To: | Balance Due: $357.50 | ||
| Item Description | Quantity | Rate | Amount |
| Item 1 | 1 | $50.00 | $50.00 |
| Item 2 | 2 | $100.00 | $200.00 |
| Item 3 | 3 | $25.00 | $75.00 |
| Subtotal: | $325.00 | ||
| Tax: (10%) | $32.50 | ||
| Total Due: | $357.50 | ||
| Notes:
Payment Options: |
|||
Sample Invoice for Freelance Work:
Here’s what a sample invoice would look like using this template:

And, here’s a real invoice that I created when I worked as a freelancer. It’s the first one that I’ve ever sent to a customer:

Now, let’s dive into how you can modify and use this template.
How to Make an Invoice for Freelancer Work
Depending on your industry and the customers you work with, you may want to adjust this template to fit your individual needs. If you’re not sure which elements should stay and which can go, here’s what to include on any type of invoice.
Contact Information
At the top of your invoice, you should include your name, company name, address, and phone number. For extra style points, you can also include your company’s logo, if you have one.
Your contact information gives customers a direct way to find you if they have questions about their bill. Be prepared to answer follow-up questions, as some folks might want context around due dates, pricing, services provided, and more.
Invoice Number & Date
The invoice number helps you keep track of services provided to different customers. As a freelancer, you’re working on multiple jobs simultaneously, which can sometimes make it challenging to keep track of which services were provided to whom, and which ones have yet to be paid for.
The invoice number and date let you know which jobs were done when, and for which customers. For example, if a customer claims they already paid you, you can look up the invoice number to see what services you charged them for and when they were provided. This is particularly handy if you are doing multiple jobs for the same customer, where you can easily mix up tasks over time.
Balance Due Date
The balance due date lets the customer know when they should pay you. This is important because it directly communicates your expectations for when they should fulfill payment. If you charge late fees, you’ll want to make sure the due date is as clear as possible on your invoice. This will help you avoid disputes later on.
Services Provided
Depending on what you’re providing, you can organize this section however you see fit. At the least, you should include a clear outline of the services and products that you have provided to your customers.
Include the name of the product or service, the quantity provided, and the cost of each one. Invoice software is useful here because it can calculate totals automatically – ensuring you charge customers the right amount for each service.
This is one place where I got stuck: what do you name your services?
Answer: anything you want. Try to make them as clear as possible and be prepared to answer questions from customers if descriptions are vague. Remember, if you’re having trouble describing it, they’re going to struggle to understand it and want answers.
Taxes & Subtotal
If you include a tax, you should clearly state it in your calculations section. Include the subtotal before the tax, then show how the tax is factored into the final balance.
In our template, we charged a 10% tax, which is listed below the subtotal. You can see the tax percentage and the additional cost added to the customer’s balance.
Total Balance Due
The total balance due should list the final cost to the customer. It should include all your services, taxes, and any other fees associated with this invoice. For peace of mind, break out your trusty calculator to make sure everything adds up.
Place the total balance near the top of the document so it’s one of the first things that customers see. This is not only convenient for them, but it also reduces the chance of miscommunication. If a customer immediately sees a list of services, numbers, and prices, they might mistake one of these rows as their total cost. This leads to time-consuming explanations that are easily avoidable if you make your total balance as clear as possible at the top of the invoice.
Payment Method & Terms
If you accept certain types of payment or agree upon a payment plan, you should also list those criteria. This can go at the bottom of the invoice as it will likely become an afterthought once you establish a rapport with returning customers.
Notes
This is a space where you can add whatever context you feel is necessary to justify the total balance due. Maybe you highlight that you completed a custom job that required a different pricing structure. Or, maybe the job got cut short, and you need to adjust the invoice accordingly. Whatever the reason is, the notes section is a great place to provide additional information for your customers.
Now that we’re familiar with the components of an invoice, let’s send this thing.
How to Send an Invoice for Freelance Work
Here are four things to keep in mind when sending an invoice for freelance work.
Pick the right communication channel.
One of the most important parts of invoicing is making sure your customers see your invoices.The last thing you want is to have your invoices get lost in some old inbox or sent to a phone numer that’s not in service.
Use your CRM to identify the best communication channels for sending invoices. That might vary by customer, which is why it helps to use shared inbox softwareat your business. This tool funnels communication to one place, so you can message customers on different platforms without switching between apps.
The two best channels for invoicing are email and text messaging. Emails are stored in a permanent inbox, and you can choose when they’re delivered to customers. Text messages offer the same deliverability, and are opened more often than emails. The downside of texting is that texts are easily deleted or lost if you don’t save the senderr’s phone number.
Write a message to provide context.
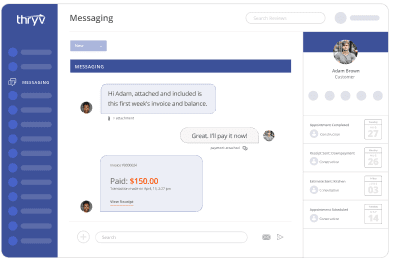
If you’re using email, most businesses provide a brief message that adds context to the invoice. For example, here’s an email I received recently for an invoice.

This email provides an overview of the services I booked and details about my appointment. It also outlines the company’s refund policy and restrictions around rescheduling.
Information like this answers potential questions I might have about my invoice. I don’t have to contact the business for help, nor do they have to spend time answering my questions. If that changes, there’s a contact number that I can use to get in touch with them.
Send the invoice at the right time.
Timing is critical when it comes to sending invoices. If customers don’t have a preferred time or day, try to send your invoice as soon as possible. That will start clock on the customer and ensure you get paid sooner rather than later.
The best times to send an invoice are usually in the morning, right as people arrive at work, and in the afternoon right before they leave. These are the times where they’re most likely to check their email or phone for new messages.
Pro Tip: Here’s where email automation can benefit your business. You can schedule marketing emails in advance and set up triggers that automatically send invoices to customers.
Follow-up as needed.
If your invoice has a due-date, you should follow up the day after it was due. After that, try a more direct channel like phone or text, and set intervals for reaching out to the customers until you receive payment. For example, you might reach out every 15 days to check in and confirm they got your message. You should also highlight any late fees that they’ve accrued and mention any next steps your business is taking to collect payment.
Email and Text Templates to Ask for Missing Payments
Get paid faster with ready-made email and text templates that help your business avoid late payments from customers.
Now that you have your invoice created, let’s talk about some best practices to keep in when billing customers.
How to Bill for Freelance Work
1. Sign a contract with your customers.
Before you complete any work, you should always sign a contract with customers. Write down what you are doing for them, the estimated cost of the service, and any other details that might be relevant.
Your industry might determine the formality. But at the end of the day, you want to make sure that both you and the customer understand the agreement that you’re undertaking. This is the time to hash out the big details and make sure you’re on the same page in terms of tasks, resources, price, etc.
2. Write the invoice after the job is complete.
Once the contract is signed, don’t rush to write your invoice, especially if the project won’t be complete for a long time. This lets you keep track of all the additional costs and fees that might stack up. While you should try to make estimates as accurate as possible, you may end up charging a slightly different price than what you quoted. By holding off on writing your invoice, you’ll avoid having to rewrite it every time an unexpected cost pops up.
3. Review invoices before sending them.
Before you hit that final “send” button, read through your invoice one more time. Double-check that all items are accounted for and that your math adds up.
Sending an inaccurate invoice can quickly damage your relationship with customers. Customers will be quick to call out an invoice with too high of a balance, and if you send one that’s too low, you’ll leave money on the table by undercharging them – or you’ll have to circle back and let them know you’ve made a mistake.
4. Be prepared for questions.
Even if your invoice is squeaky clean, be prepared to answer questions. Not all of these are malicious, as some customers will just be curious why certain services or goods cost as much as they do. They’re doing the same double-checks and reviews as you are with this invoice.
Be open and transparent. If there’s a conflict over price, refer back to your written agreement to find common ground. This is where it helps to list your pricing upfront, so customers know what they’re agreeing to before signing any contracts.
5. Offer multiple payment methods.
If possible, you should offer multiple payment options to your customers. Not only is this convenient, but it also increases your chances of getting paid. The more ways that customers can pay you, the more likely they are to do it. And, they’ll do it quickly, because you’re meeting them on their preferred channels.
6. Ask customers when they want their invoices.
One of the best steps I took as a freelancer was simply asking my customers when and how they wanted their invoices. I was sending an invoice after every single piece I worked on until finally, I asked, “Hey, do you mind if I group a few of these together and send them to you every other week?”
People loved this. They knew when to expect their next invoice, and I wasn’t harassing them with a barrage of emails. If you’re unsure when you should be billing your customers, just ask them – they might have a preference.
7. Consider invoice software.
If you want to eliminate a lot of the hassle, consider adopting invoice software. Many of these tools can connect to your CRM, which makes it easy to create and send invoices from any device. And, templates are customizable, so you can personalize them for your business.
I used one, and it provided a lot of assurance that I was doing things correctly. They’re also handy tools if you’re constantly sending invoices and want a quick and reliable way to bill customers.
Making an Invoice for Freelance Work
Freelancing can be an excellent way to earn money. You work as your own boss, pick projects that you want to work on, and effectively run your own business.
Part of running a business is getting paid, though – a big part. Using the template above, you should now have a way to bill your customers for your work. Follow these steps to fill out your invoice and keep racking up the revenue doing whatever it is that you love.
Email and Text Templates to Ask for Missing Payments
Get paid faster with ready-made email and text templates that help your business avoid late payments from customers.