Finding the right business management software for your small business can be a game-changer — that’s why you’re using Thryv. But, wouldn’t you like some tips to get even more out of it?
While you may be acquainted with its core functionalities, there are some hidden gems within the Thryv platform that can significantly improve your operations and help grow your business.
Get ready to dive deep into the untapped potential of your Thryv software and discover how it can do so much more than you ever imagined.
Buying Software
Checklist
With so many software options, we’ll help you determine which tools are right for your small business and how to choose the best ones in this free ebook.
Thryv Tip #1: Build an Invoice with Hidden Prices
Do you need the option to break down line items of a project for your books without sharing the full breakdown with your client? Rather than sending your client an invoice and then tracking the costs of labor, materials and other deliverables in another location — do it all in one place.
Your Thryv invoices allow you to add items with individual prices as well as hidden individual prices that display as one total cost.
This way, your client only sees the total cost while you see everything. Once you create an invoice, here’s how you hide line item prices:
- Place your first item on the invoice by selecting a service from the dropdown menu or creating a custom item. You can add multiple services to the same invoice by following the same steps.
- To hide individual item prices, click on “Add an item header” and enter the name of the header, and then click “Save.”
- Select your first item to add under the header by choosing a service from the dropdown menu or creating a custom item.
- The invoice will reflect all items above and below the header. To hide the individual item totals under the header, click “Customize Headers.” Here you will see the option to turn off the subtotal for item header and/or prices for line items.
- Turning off the items allows clients to view individual line items without headers.
- The prices in the light color will not be visible to your client.
For a more detailed walkthrough, click here.
Plus, you can accomplish a lot more with your invoice than just getting paid. If done correctly, you can use it to market your business, generate reviews and more using custom campaigns.
Thryv Tip #2: Save a Campaign for a Rainy Day
Did you know you can turn every campaign into a powerful landing page? With a direct link to the landing page, each campaign becomes a valuable asset you can utilize in various ways, such as including the link on invoices, posting it on social media or adding it to emails.
By adopting this approach, you’ll be able to seamlessly direct your clients and potential customers to your campaigns. Plus, by having your campaigns created in advance, whenever an opportunity pops up, you’re prepared to share the link.
For instance, let’s say you’re a roofer offering complimentary assessments for hail damage. In this case, you can develop a strategic campaign. Whenever a storm sweeps through the area, all you need to do is insert the campaign link into your upcoming emails or social media posts to effectively spread the message.
On the other hand, if your goal is to enhance your online reputation, you can build a campaign page that encourages clients to share online reviews. These review links can be conveniently accessed and incorporated into your Client Portal, social media posts or even added to invoices.
Watch this video to create a campaign with your Thryv software:
There are a lot of ways you can customize your campaign’s landing page.
Thryv Tip #3: Create Custom Calls to Action on Your Client Portal
The Client Portal offers a powerful solution to engage clients and prompt them to take action, whether you want them to follow your social channels or pay for an upcoming appointment.
With a few simple steps, you can create customized call-to-action links for specific activities, such as sending a message, scheduling an appointment, sharing documents and making payments. You can even direct them to one of those custom campaigns you just made (see Tip #2).
The best part, your links don’t have to go to your website if you don’t want them to. You can direct clients to follow one of your social channels, leave you a review on your website or donate to a cause you’re supporting. The possibilities are endless.
Let’s add a custom CTA:
- Open the Client Portal by clicking on the Client Portal option in the left navigation pane, then click on the “Create Direct Links” button.
- Decide where you want to place the call-to-action link on the page.
- Choose the specific action you want your clients to take. Whether it’s scheduling an appointment, sending a message, sharing documents or making a payment, you can tailor the link to suit your needs.
- Lastly, copy the generated link at the bottom of the Instructions section. Once copied, you’re ready to place it anywhere.
To really get the most out of your custom CTAs, you can tag the link. This feature allows you to track from which URL or campaign the request was submitted, providing valuable insights into your marketing efforts.
Click here for a step-by-step walk-through.
Thryv Tip #4: Set Password-Protected Pages
Password-protected pages allow you to safeguard specific content on your website with a secure password.
By adding passwords to particular pages, you can control access and ensure that only authorized visitors can view the exclusive content. This feature proves invaluable when sharing sensitive information tailored for specific audiences or when you want to restrict access to download content.
For example: If you only want existing clients to have access to custom package descriptions or release forms, simply password protect them and only share the code with those specific customers.
If you’re wondering how to create password-protected pages, we’ll guide you through the straightforward process that grants you complete control over who can access your valuable content.
- Navigate to Pages located on the left menu.
- Click the Settings button on a specific page.
- Click the Set Password button to set your password.
- Set a password for the page. The password can be made of any character as long as you don’t exceed 100 characters.
- Click save. Your page is now protected by a password. You can remove this password at any time by clicking Remove password.
Learn more about password-protected pages by clicking here.
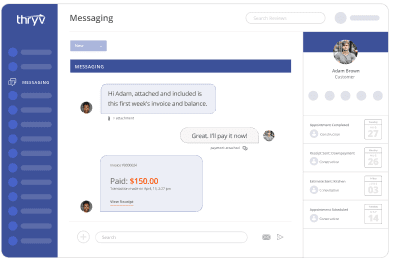
Bonus: Use TeamChat to Send a Message — to Yourself
Messaging yourself on a platform like TeamChat is a refreshing gift when you’re constantly juggling numerous tasks and responsibilities. It helps you stay organized and keeps important notes at your fingertips.
Whether it’s jotting down a brilliant idea, a reminder for a future task or insights from a meeting, sending quick messages to yourself creates an easily accessible digital notepad.
Embracing this simple yet powerful habit of messaging yourself can be a valuable productivity tool, empowering you to stay organized. Plus, TeamChat is available with the free-forever Thryv Command Center.
Use Thryv to Propel Your Business Forward
Thryv software holds a treasure trove of hidden gems that can revolutionize how you manage your small business. The more you use your Thryv software, the more you’ll unearth.
Let Thryv be your ally in achieving business success and unlocking new possibilities you might never have imagined before.
Buying Software
Checklist
With so many software options, we’ll help you determine which tools are right for your small business and how to choose the best ones in this free ebook.